
Why use Single sign-on (OAuth) in Laravel?
Email authentication is the default authentication flow in Laravel, but increasing number of users are relying on OAuth providers like Google or Facebook to authenticate.
By implementing SSO (Single sign-on) or OAuth authentication your Laravel application will get already verified emails, so no need to send verification emails.
From experience, we know that scammers and bots never use SSO authentication, since faking it requires running the headless browser, keeping track of cookies, solving captchas on SSO provider pages, etc. That's too much of a headache when they can simply use plain email sign-ups to create new accounts.
So in fact it's better if you go all-in with SSO authentication and make pure email authentication a bit harder.
Use Laravel Socialite Package
Our setup is fresh Laravel 10 installation with a Laravel Breeze starter kit using Blade only. You can implement this in any other setup, it's similar but it won't be identical to our tutorial.
laravel new tuts

composer require laravel/breeze --dev

php artisan breeze:install

php artisan migrate
npm install
npm run dev
Laravel Socialite is official Laravel package for handling Social authentications (SSO). It supports every major OAuth provider like Facebook, Twitter, LinkedIn, Google, GitHub and many more. You can see full list of Sociliate Providers here.
Installation
In order to install Laravel Socialite run:
composer require laravel/socialite
Based on the OAuth provider we plan to use, we need to add their keys into the .env file and in config/services.php.
This is format of the keys in services.php:
    'google' => [
        'client_id' => env('GOOGLE_CLIENT_ID'),
        'client_secret' => env('GOOGLE_CLIENT_SECRET'),
        'redirect' => env('GOOGLE_REDIRECT')
    ],

    'linkedin' => [
        'client_id' => env('LINKEDIN_CLIENT_ID'),
        'client_secret' => env('LINKEDIN_CLIENT_SECRET'),
        'redirect' => env('LINKEDIN_REDIRECT')
    ],
In order to obtain OAuth client id and client secret we need to create these apps.
Google OAuth Configuration
In order to get client id and client secret keys for Google OAuth you need to visit Google Cloud Platform and create new project.
Create OAuth consent screen
In sidebar choose APIs & Services -> OAuth consent screen.
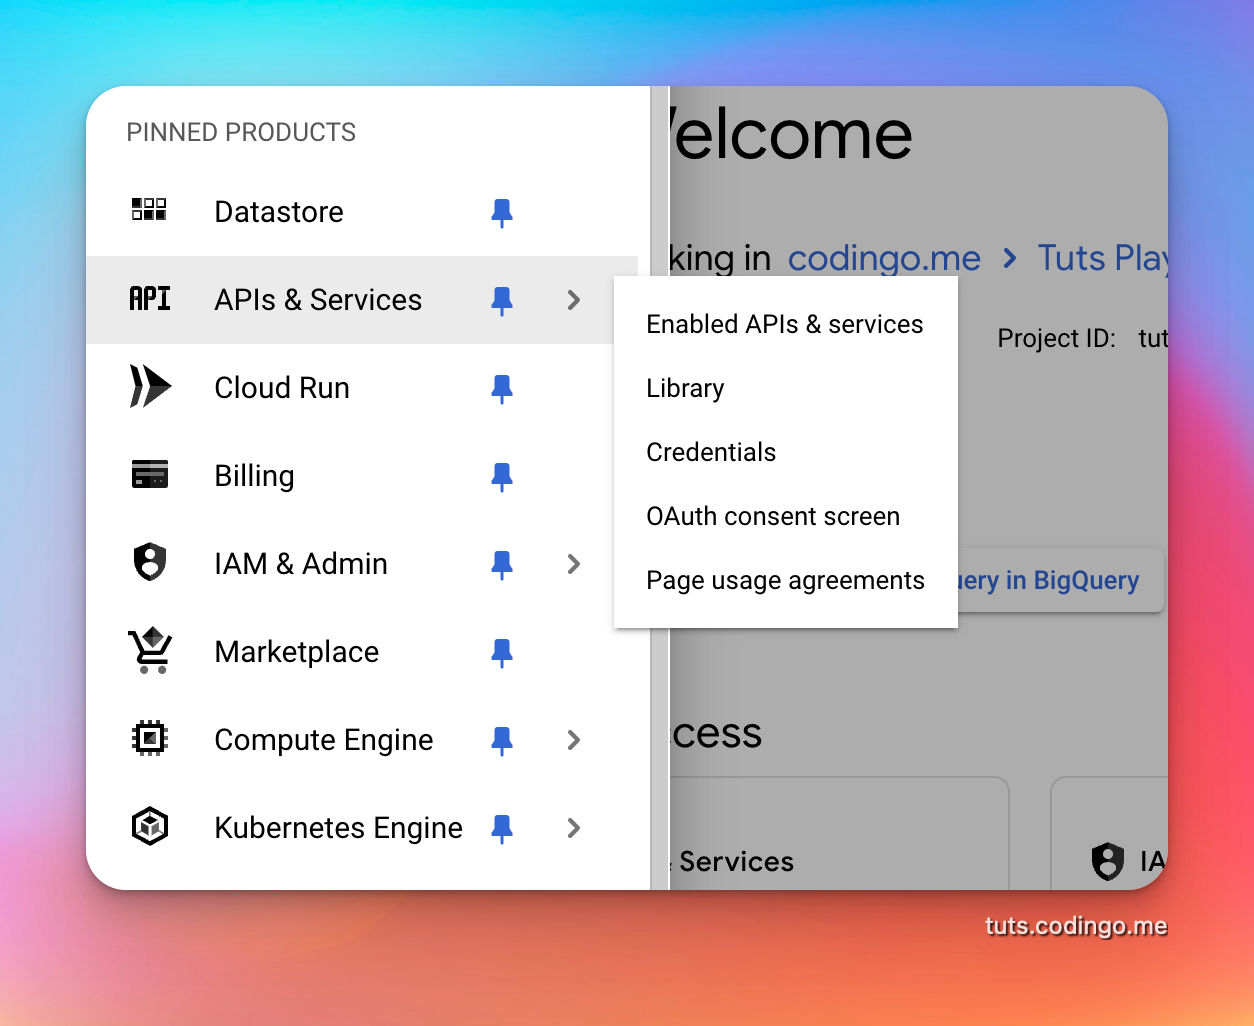
Type of app you're creating is External, since you want external users to be able to authenticate. Form will ask you for some basic details and in Authorized domains insert main domain which you're going to use.
You can click submit and go through other pages since you don't need to input anything there.
Before you decide to go Live you'll need to click Publish App button in your OAuth consent screen.
Create OAuth 2.0 Client IDs
You need to go back to the sidebar and click on Credentials tab.
There click the Create Credentials button and choose OAuth client ID.
Fill required inputs and inside Authorized redirect URIs enter domain where you will be hosting your app and a route to sso/google/callback put full path like https://example.com/sso/google/callback.
Hit the Create button and download credentials. Make sure you place them in your .env file.
Other OAuth providers
We won't go into details how to obtain OAuth keys for other providers, I'll just list where you can do that.
- Facebook: https://developers.facebook.com/
- LinkedIn: https://developer.linkedin.com/
- Twitter: https://developer.twitter.com/
Callback URIs will be different based on the OAuth provider, so just replace google with the respective provider name.
OAuth Authentication in Laravel
OAuth flow works like this:
- You click a button on the site and site redirects you to the OAuth provider
- On OAuth provider page you optionally choose account and authorize app
- OAuth provider redirects you back to the app
- App receives user account details: id and email
OAuth routes
On Laravel side this mean we have 2 routes, one will redirect to the OAuth provider and other will receive a callback from the OAuth provider.
Add this to you web.php file outside of auth middleware:
Route::get('/sso/{provider}', [SSOController::class, 'redirectToProvider'])
    ->where('provider', '(facebook|twitter|google|linkedin)')
    ->name('sso.redirect');
Route::get('/sso/{provider}/callback', [SSOController::class, 'handleProviderCallback'])
    ->where('provider', '(facebook|twitter|google|linkedin)')
    ->name('sso.callback');
OAuth Controller Logic
You have full control over how you want to handle OAuth logins.
Some applications won't allow OAuth login for account which was created through email (weird).
Others won't create your account if you're accessing from the login route (also weird).
What is the best approach?
The best approach is to allow same email to authenticate via any channel, meaning any OAuth provider. User should be able to login the same way via email, or with associated Google or Facebook account.
If user is on login page and doesn't have an account, we should create it and just seamlessly log him in.
It's that easy!
Creating SSO Accounts Table
Since one user can have multiple OAuth providers connected, we need to create table which will hold these details.
Run from terminal:
php artisan make:migration create-sso-accounts --create=sso_accounts
And inside the migration file insert:
<?php

use Illuminate\Database\Migrations\Migration;
use Illuminate\Database\Schema\Blueprint;
use Illuminate\Support\Facades\Schema;

return new class extends Migration
{
    /**
     * Run the migrations.
     */
    public function up(): void
    {
        Schema::create('sso_accounts', function (Blueprint $table) {
            $table->id();
            $table->unsignedBigInteger('user_id');
            $table->foreign('user_id')->references('id')->on('users')->onDelete('cascade');
            $table->string('provider');
            $table->string('provider_id');
            $table->timestamps();
        });
    }

    /**
     * Reverse the migrations.
     */
    public function down(): void
    {
        Schema::dropIfExists('sso_accounts');
    }
};
This migration file will create table sso_accounts which has a FK to users table and columns for a OAuth provider name, and OAuth account id.
Now run the migration:
php artisan migrate
SSO Account Eloquent Model
We need to add new Eloquent Model to the app, we'll name file SsoAccount.php.
<?php

namespace App\Models;

use Illuminate\Database\Eloquent\Relations\BelongsTo;
use Illuminate\Database\Eloquent\Model;

class SsoAccount extends Model
{
    protected $guarded = ['id'];

    public function user() : BelongsTo
    {
        return $this->belongsTo(User::class);
    }
}
SSO Controller with redirects
In SSOController.php file we'll add logic for OAuth flow.
<?php

namespace App\Http\Controllers\Auth;

use Laravel\Socialite\Facades\Socialite;
use Illuminate\Auth\Events\Registered;
use Illuminate\Support\Facades\Auth;
use Illuminate\Support\Facades\Hash;
use App\Http\Controllers\Controller;
use Illuminate\Support\Str;
use App\Models\SsoAccount;
use App\Models\User;
use Carbon\Carbon;

class SSOController extends Controller
{
    public function redirectToProvider($provider)
    {
        return Socialite::driver($provider)->redirect();
    }

    public function handleProviderCallback($provider)
    {
        $user = Socialite::driver($provider)->user();

        if (is_null($user->getEmail())) {
            return redirect()->to(route('login'))->with([
                'error' => 'You have to share email with us.'
            ]);
        }

        $localUser = User::where('email', $user->getEmail())->first();

        if (empty($localUser)) {
            $localUser = User::create([
                'name' => $user->getName(),
                'email' => $user->getEmail(),
                'password' => Hash::make(Str::random(32)),
            ]);

            $localUser->forceFill([
                'email_verified_at' => Carbon::now()
            ])->save();

            event(new Registered($localUser));
        }

        SsoAccount::firstOrCreate([
            'user_id' => $localUser->id,
            'provider' => $provider,
            'provider_id' => $user->getId()
        ]);

        Auth::login($localUser);

        return redirect()->to('/');
    }
}
It consists of 2 methods redirectToProvider and handleProviderCallback.
Method redirectToProvider is redirecting user to the desired OAuth provider.
Other method handles callback from the OAuth provider. After some basic checks we check is there any existing user with provided email address. If there is no such user we create it and store object inside $localUser variable.
After that we check is this SSO Account already connected, if not we connect it.
Lastly we authenticate user and redirect him to the app.
OAuth Login Blade View
We have routes and controller logic ready, now only thing left is to create OAuth buttons on a login page.
This is how final form will look:

We used default Laravel Breeze login view and just added a row with these buttons.
<div class="mt-8">
        <div class="relative">
            <div class="absolute inset-0 flex items-center">
                <div class="w-full border-t border-gray-300"></div>
            </div>
            <div class="relative flex justify-center text-sm">
            <span class="px-2 bg-white text-gray-500">
              Or continue with
            </span>
            </div>
        </div>

        <div class="mt-6 grid grid-cols-3 gap-3">
            <div>
                <a href="{{ route('sso.redirect', ['provider' => 'facebook']) }}" class="w-full inline-flex justify-center py-2 px-4 border border-gray-300 rounded-md shadow-sm bg-white text-sm font-medium text-gray-500 hover:bg-gray-50">
                    <span class="sr-only">Sign in with Facebook</span>
                    <svg class="w-5 h-5" fill="currentColor" viewBox="0 0 20 20" aria-hidden="true">
                        <path fill-rule="evenodd" d="M20 10c0-5.523-4.477-10-10-10S0 4.477 0 10c0 4.991 3.657 9.128 8.438 9.878v-6.987h-2.54V10h2.54V7.797c0-2.506 1.492-3.89 3.777-3.89 1.094 0 2.238.195 2.238.195v2.46h-1.26c-1.243 0-1.63.771-1.63 1.562V10h2.773l-.443 2.89h-2.33v6.988C16.343 19.128 20 14.991 20 10z" clip-rule="evenodd"></path>
                    </svg>
                </a>
            </div>

            <div>
                <a href="{{ route('sso.redirect', ['provider' => 'google']) }}" class="w-full inline-flex justify-center py-2 px-4 border border-gray-300 rounded-md shadow-sm bg-white text-sm font-medium text-gray-500 hover:bg-gray-50">
                    <span class="sr-only">Sign in with Google</span>
                    <svg class="w-5 h-5" xmlns="http://www.w3.org/2000/svg" viewBox="0 0 488 512">
                        <path fill="currentColor" d="M488 261.8C488 403.3 391.1 504 248 504 110.8 504 0 393.2 0 256S110.8 8 248 8c66.8 0 123 24.5 166.3 64.9l-67.5 64.9C258.5 52.6 94.3 116.6 94.3 256c0 86.5 69.1 156.6 153.7 156.6 98.2 0 135-70.4 140.8-106.9H248v-85.3h236.1c2.3 12.7 3.9 24.9 3.9 41.4z"></path>
                    </svg>

                </a>
            </div>

            <div>
                <a href="{{ route('sso.redirect', ['provider' => 'linkedin']) }}" class="w-full inline-flex justify-center py-2 px-4 border border-gray-300 rounded-md shadow-sm bg-white text-sm font-medium text-gray-500 hover:bg-gray-50">
                    <span class="sr-only">Sign in with LinkedIn</span>
                    <svg class="w-5 h-5" xmlns="http://www.w3.org/2000/svg" viewBox="0 0 448 512">
                        <path fill="currentColor" d="M100.28 448H7.4V148.9h92.88zM53.79 108.1C24.09 108.1 0 83.5 0 53.8a53.79 53.79 0 0 1 107.58 0c0 29.7-24.1 54.3-53.79 54.3zM447.9 448h-92.68V302.4c0-34.7-.7-79.2-48.29-79.2-48.29 0-55.69 37.7-55.69 76.7V448h-92.78V148.9h89.08v40.8h1.3c12.4-23.5 42.69-48.3 87.88-48.3 94 0 111.28 61.9 111.28 142.3V448z"></path>
                    </svg>
                </a>
            </div>
        </div>
    </div>
You can add these same buttons into register.blade.php.
With the login buttons Laravel OAuth flow is completed.
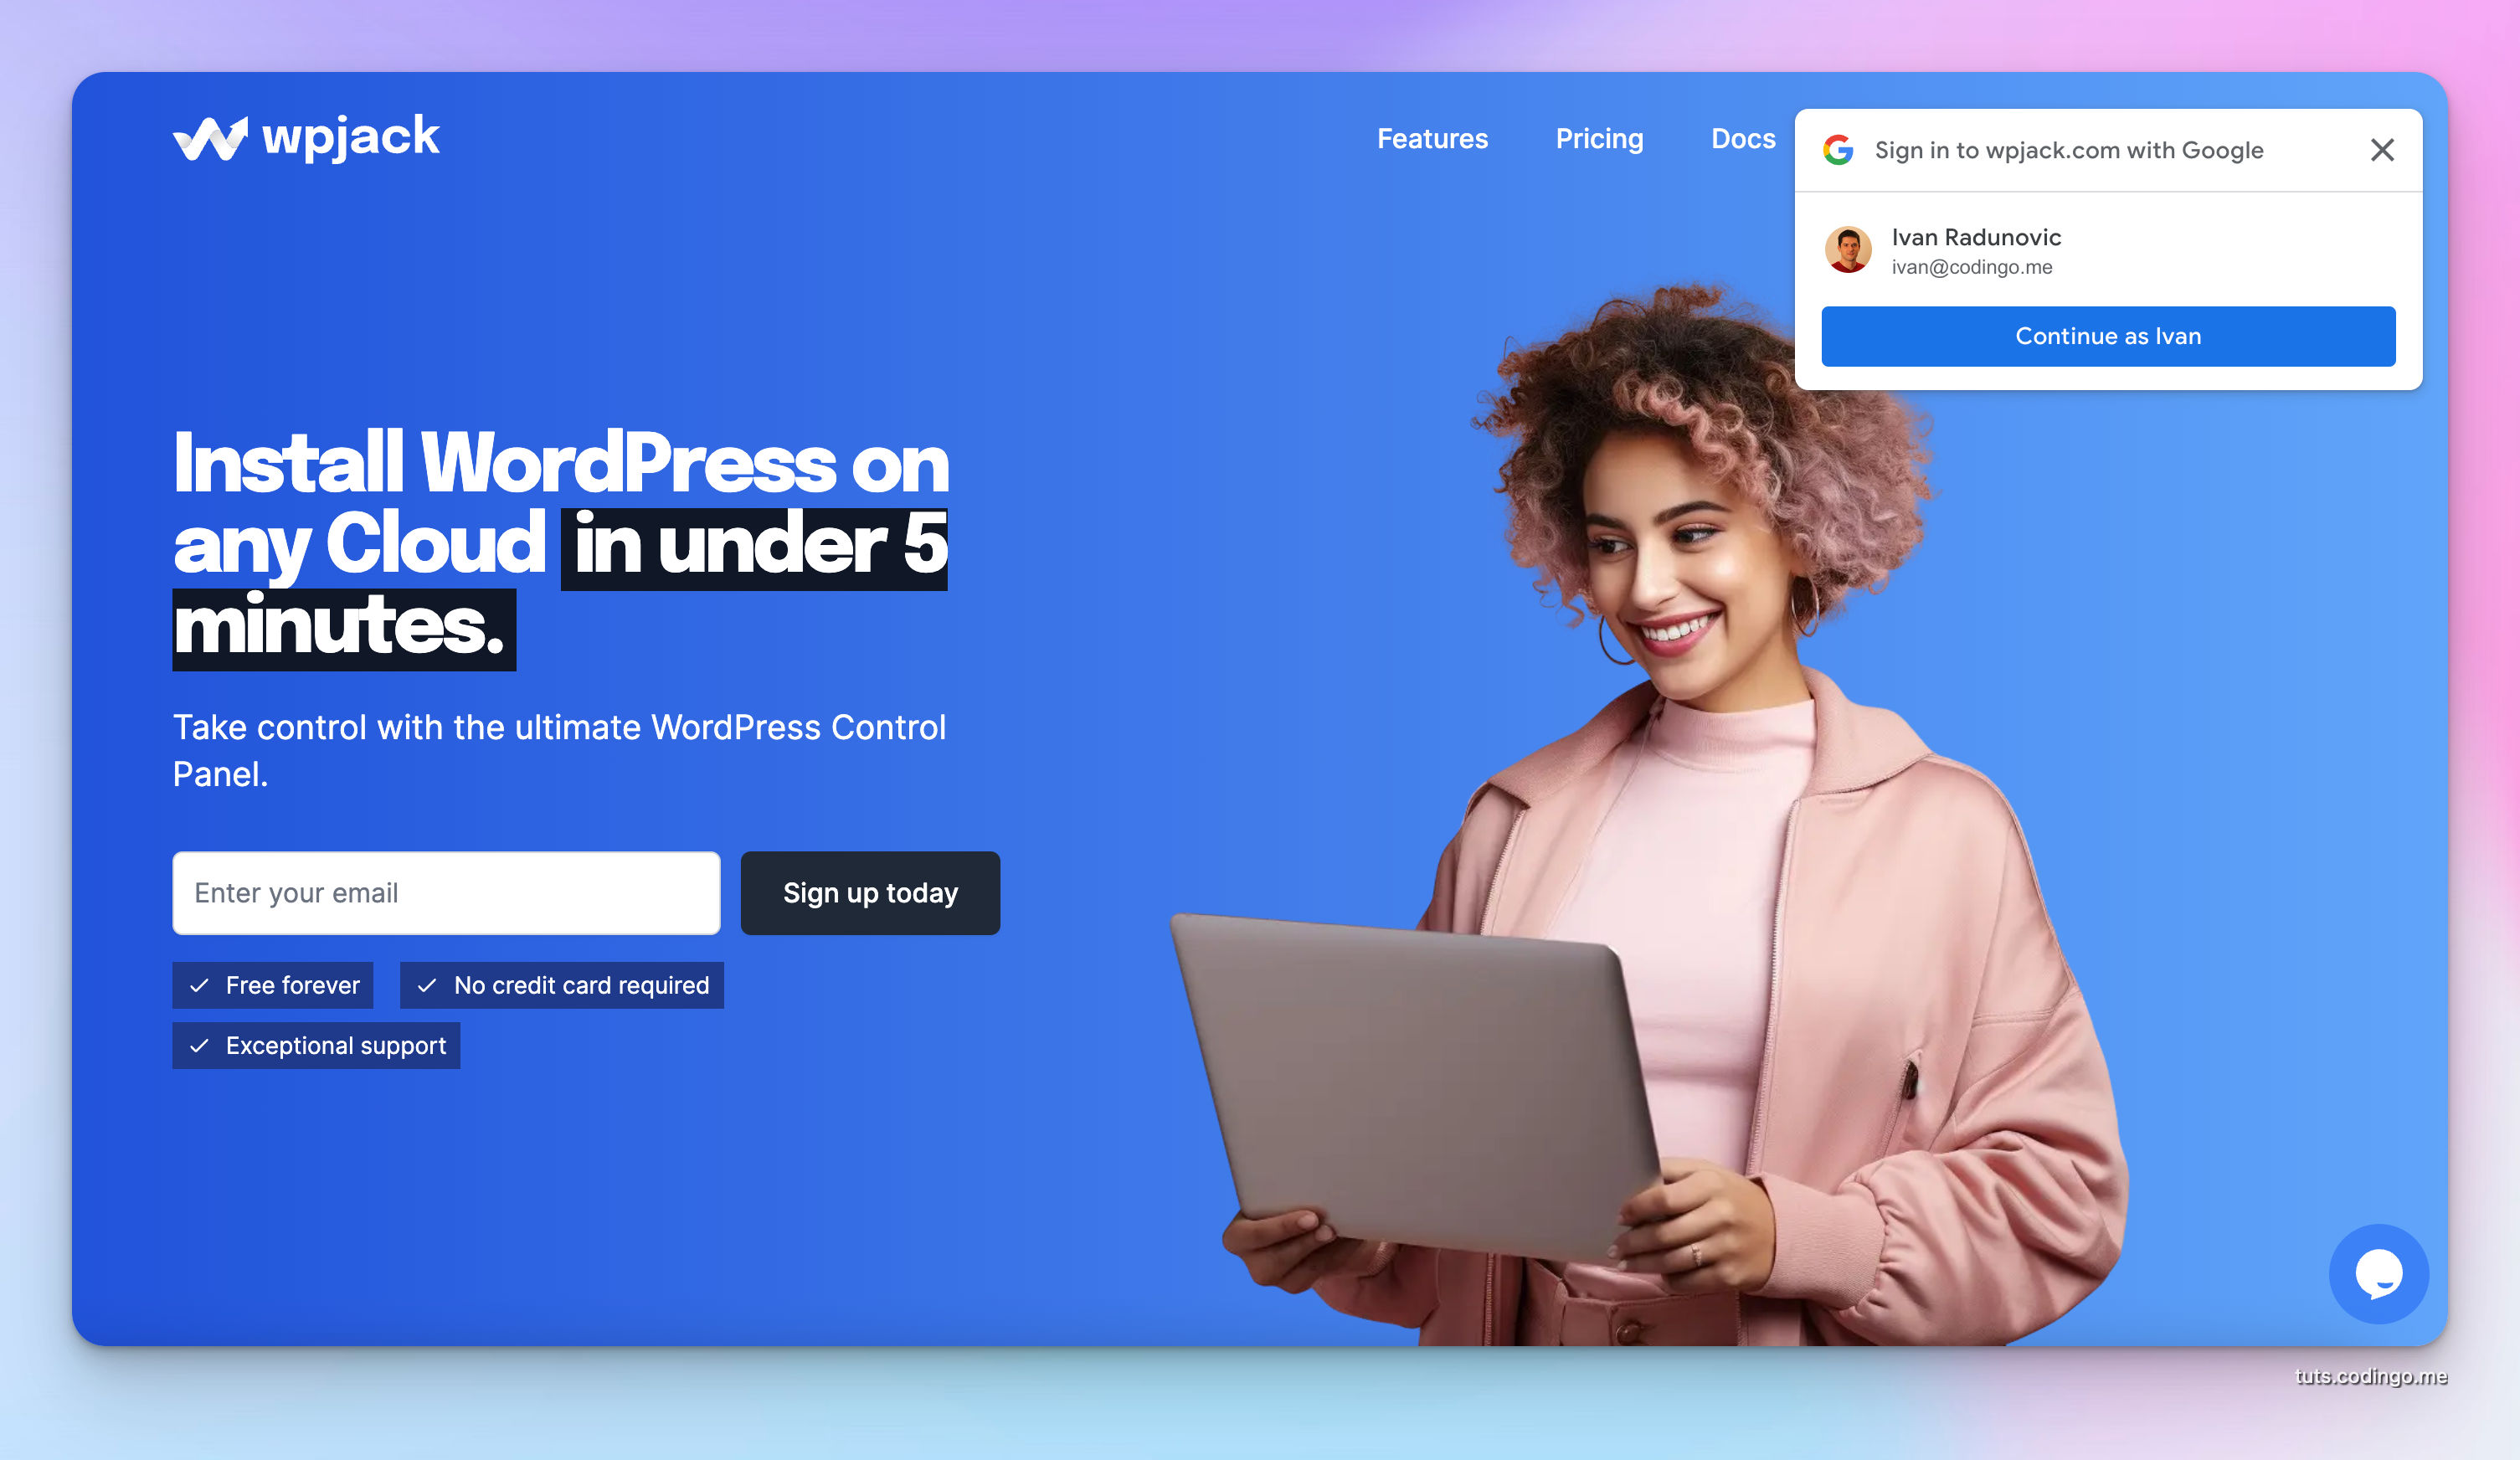
Google One Tap in Laravel
Google One Tap authentication enables user to login into 3rd party app just by selecting already authenticated Google account.
In same cases it can login user without asking, but we'll integrate it in the non-intrusive way.
Usually it displays account selection prompt in top-right corner of a website.
For One Tap we need to use google/apiclient php package, so we'll install it:
composer require google/apiclient
Google One Tap Laravel Controller
We'll be building on top of the SSO logins from above, meaning we'll reuse same sso_accounts table and the Eloquent model.
In fact Google One Tap Logic is the same as OAuth flow explained above, only number of steps in the flow are reduced here.
<?php

namespace App\Http\Controllers\Auth;

use Illuminate\Auth\Events\Registered;
use App\Http\Controllers\Controller;
use Illuminate\Support\Facades\Auth;
use Illuminate\Support\Facades\Hash;
use Illuminate\Http\Request;
use Illuminate\Support\Str;
use App\Models\SsoAccount;
use App\Models\User;
use Carbon\Carbon;

class GoogleOneTapController extends Controller
{
    public function __invoke(Request $request)
    {
        $idToken = $request->input('credential');
        $client = new \Google_Client([
            'client_id' => config('services.google.client_id')
        ]);

        $payload = $client->verifyIdToken($idToken);
        if (!$payload) {
            \Log::info('no google payload');
            return back();
        }

        $email = $payload['email'];

        $localUser = User::where('email', $email)->first();

        if (empty($localUser)) {
            $localUser = User::create([
                'name' => $payload['name'],
                'email' => $email,
                'password' => Hash::make(Str::random(32)),
            ]);

            $localUser->forceFill([
                'email_verified_at' => Carbon::now()
            ])->save();

            event(new Registered($localUser));
        }

        SsoAccount::firstOrCreate([
            'user_id' => $localUser->id,
            'provider' => 'google',
            'provider_id' => $payload['sub']
        ]);

        Auth::login($localUser);

        return redirect()->to('/');
    }
}
You'll notice that this controller has almost the same logic as a SSOController we created earlier. If this was a real project next step would be to refactor the code and reuse same logic from these two controllers.
At the start we check submitted credential using Google API, if token is not valid user is redirected back.
Load Google One Tap in the front-end
On the pages where we want to display Google One Tap Prompt we should include JS script.
In this case that's a guest.blade.php layout file.
@if(config('app.env') === 'production')
<div id="g_id_onload"
     data-client_id="{{ config('services.google.client_id') }}"
     data-auto_select="false"
     data-login_uri="https://example.com/google/ot">
</div>
@endif
You can modify prompt in countless ways, full list of attributes is on Sign In With Google HTML API reference.
In this basic JS setup we load client_id, disable auto-select of the Google account (which means prompt will ask user to choose Google account) and we specified uri where token will be posted.
One Tap Route
Only thing left is to create new route, outside of auth middleware.
Route::post('google/ot', GoogleOneTapController::class);
Common issues with Google One Tap
If you're including JS code on any other page even if it's behind auth middleware, One Tap prompt will be displayed.
Prompt has a cooling-off period, but you can disable it while developing. This means that if you close prompt one time, you won't see One Tap prompt again. Or it may look to you like it's displaying randomly.